Skip to content
60% Off In-The-Hoop + $5 Off $30
Stock Up & Save
Search
Search
Reset
Log in
Cart
Menu
Shop All Designs
Back
Shop All Designs
By Theme
Holidays
Animals
Flowers & Nature
Fantasy & Myth
Humor
Food & Drink
Activities & Interests
Spring Embroidery
Go to By Theme
By Project
Panel Scenes
Fashion & Accessories
Plushies & Dolls
Kid's Projects
Quilting
Gifts & Occasions
Crafting
Coasters
Go to By Project
By Technique
In-the-Hoop
Embossed
Applique
Freestanding Lace
Freestanding Embroidery
Glow
Stained Glass
Organza
Go to By Technique
By Exclusive Style
Baroque
Gilded
Illuminated
Steampunk
Cottagecore
Emerging
Celtic
Celestial & Zodiac
Go to By Exclusive Style
Gift Cards
Bestsellers
New
Flowers & Nature
Back
Flowers & Nature
Flowers
Seasons
Botanicals
Trees & Leaves
In-the-Hoop
Back
In-the-Hoop
Bookmarks
Coasters
Mug Rugs
Purses & Bags
Patches
Trivets & Pot Holders
Christmas In-the-Hoop
Bag Charms
Learn & Inspire
Back
Learn & Inspire
Projects & Tutorials
Stitchers Showcase
Inspiration Gallery
Welcome Center
Thread Exchange
Free
Sale
Back
Sale
Current Deals
Sale Designs
Product Title
×
✔
View Cart
Checkout
or Continue Shopping
Embroidered Book Sleeve
Pen Holder (In-the-Hoop)
Embroidered Journal Cover
Embroidery with Metallic Thread
Your First Machine Embroidery Project
Personalizing Blank In-the-Hoop Designs
Using Fashion Stitch Kits
Multi-Piece Garden Flag
In-the-Hoop Keychain
Fabric Cube Organizer
Growth Chart with Embroidered Ruler
Multi-Panel Table Runner
How to Make an Embroidered Patch (In-the-Hoop)
Applique Mug Rugs (In-the-Hoop)
How to Make a Shaped Embroidered Pillow
How to Make an Embroidered Applique Panel Scene
How to Make an Interchangeable Jacket
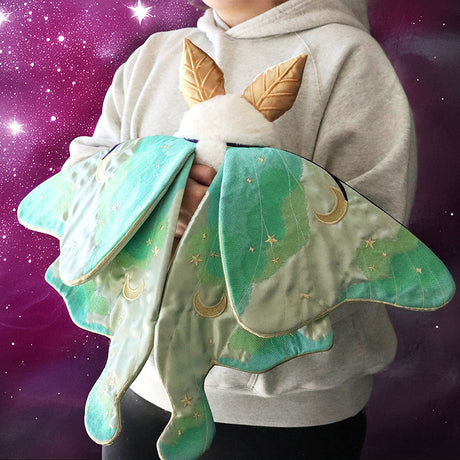
How to Make a 3D Moth or Butterfly (In-the-Hoop)
Pillow Pair Placement
Four Corners Placemat
3D Purse (In-the-Hoop)
Lace Edge Coasters (In-the-Hoop)
How to Embroider on a Jacket
In-the-Hoop Multi-Piece Bookmark
How to Embroider Nylon Screen
Drawstring Dice Bag
Wallet Wristlet (In-the-Hoop)
Double-Sided Lined Zipper Pouch (In-the-Hoop)
3D Layered Lace
Jointed Doll (In-the-Hoop)
How to Make a Multi-Piece Embroidered Stocking
D20 Ornament (3D Lace)
In-the-Hoop Needle Book
Plushie Pals (In-the-Hoop)
Faux Fur Ornament (In-the-Hoop)
Envelope Clutch (In-the-Hoop)
Embroidering on Knit Winter Hats
Embroidered Phone Case
Pot Holder (In-the-Hoop)
Simple Plush Kit
3D Lace Skull
Faux Fur Plushies (In-the-Hoop)
How to Make an Embroidered Crossbody Purse
Printing and Stitching Dielines
Unique Monogramming Ideas
Embroidery on Faux Leather
Multi-piece Applique with Faux Fur
Freestanding Fabric Designs
Freestanding Fabric with Applique
Freestanding Embroidery Patch
Fringe Embroidery
Trim-Away Applique
Puff Foam Embroidery
Brushed Embroidery
Embroidery on Velvet
How to Place Embroidery Designs
Embroidery on Cardstock
Freestanding Embroidery
Vinyl Applique with Dielines
Embroidery on Sheer Fabric
Bobbinwork Embroidery
Embroidering with Thick Thread
Embroidering Over Seams
Nine Piece Applique Table Center
3D Applique
Choosing Stabilizer
Preventing Shifting and Gapping
Quilting with Embroidery Designs
Faux Fur Christmas Stocking
Poinsettia (Freestanding Fabric)
Layered Organza Flower
Round Bolster Pillow
Embroidered Thaumatrope
Patchwork Tea Cozy
3D Lace Ornament
Layered Organza Butterfly
Freestanding Lace Embroidery
Coasters (In-the-Hoop)
Gift Tag (In-the-Hoop)
Lace Candle Wrap
Stitch and Turn Stuffies (In-the-Hoop)
Yoga Mat Bag
Rag Doll
Stitching Patch Designs onto Fabric
Battenburg Lace
Multi-Piece Lace Mask
Machine Embroidery Basics
Using Patch Borders
Design Hacks
DIY Reverse Applique
Edgy Applique
Raw Edge Stuffies (Sew Together)
Adding Text to Frames and Labels
Embossed Embroidery
Raw Edge Stuffies (In-the-Hoop)
Using Embroidery Alphabets
Raw Edge Applique
Puff Underlay Keychain
Customer Spotlight: Cat In the Dice Bag
How to Make an In-the-Hoop Stitch-and-Turn Stuffed Ornament
How To Make a Machine Embroidered Zipper Pouch
Batting Ornament (In-the-Hoop)
Handwarmers (In-the-Hoop)
New Technique! Batting Applique
Applique Trivet (In-the-Hoop)
Tabletop Christmas Tree (In-the-Hoop)
Front Flap Purse (In-the-Hoop)
Zipper Pouch (In-the-Hoop)
Articulated Unicorn (Freestanding Embroidery)
Scalloped Lace Brooch
Orchid (Freestanding Embroidery)
Corner Bookmark (In-the-Hoop)
Phone Memo Pad
Hooped Shadowbox
Lace Trimmed Stocking (In-the-Hoop)
Wine Bottle Cozy
Tiered Skirt
Layered Lace Butterfly
Quilt Blocks (In-the-Hoop)
Lace Fairy
Lace Lotus Candle Holder
Pop-Up Applique Tent
Freestanding Lace Wreath
3D Organza Flower
Petite Lace Parasol
Butterfly Shadowbox
Leather and Linen Clutch
How to Create Split Seam Machine Embroidery
Freestanding Lace Bracelets
How to Make an Embroidered Panel Scene
Edge-to-Edge Quilting
Organza and Freestanding Lace Bookmark (In-the-Hoop)
How to Make a Machine Embroidered Faux Leather Dice Tray
How to Make an In-the-Hoop Bookmark
How to Assemble an In-the-Hoop Candy Holder
Candy Hugger (In-the-Hoop)
Applique Elbow Patches
DIY Embroidered Patches
Lace Eiffel Tower
Applique Sweater Repeat
Lace House Ornament
Lace Dreamboat
Boho Button-Up Shirt
Flying Monkey Kids' Tee
Advent Calendar Bunting
Lace Lantern
Santa's Lace Sleigh
Lace Bowl
Haunting Lace Scene
Lace Pirate Patch
Lace Earrings
Embroidered Sun Hat
Lace Pocket Ornament
Lace Starlight Ornament
Stitching with Glow Thread
Lace Flower Creations
Raw Edge Stuffie Ornaments
Embroidered Collar Tips
Fabric Decoupage Tray
No-Sew Script Scarf
Organza Overlay Shirt
Organza Overlay Jacket
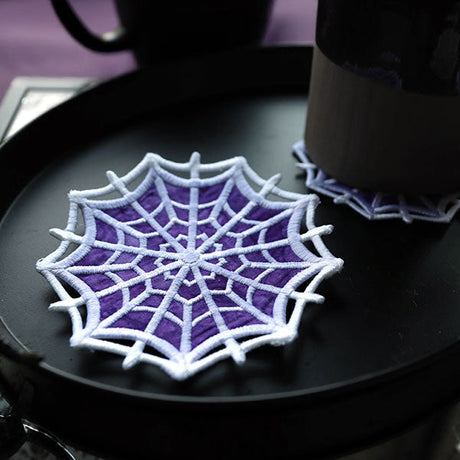
Lace Spiderweb Doily
Floating Wings Tee
Linen and Lace Wedding Bunting
Magnetic Memo Board
Drawstring Bag (In-the-Hoop)
Scented Sachet (In-the-Hoop)
Embroidered Lampshade
Mini Patch Hair Clips
Table Runner
Ribbon Memo Board
Zipper Pouch
Knitting Needle Roll
Lace-up Socks
Bookmark with String Attached Accent (In-the-Hoop)
Statement Pillow
Bunting (In-the-Hoop)
Pattern Repeat Hoodie
Multi-Piece Votive Wrap (Lace)
Cloud Stuffie Mobile
Lace Envelope
Lace Dress Form
Lace Poinsettia
Scroll Wall Hanging
Lace Lampshade
Fur Cuff Boots
Slipper Socks
Bleached Celestial Pajamas
Tissue Holders (In-the-Hoop)
Dark Adornments Lace
Christmas Tree Skirt
Stretched Canvas
Embellished Candle
Creature Pillow
Crazy Patchwork Applique
Relaxation Gift Basket
Layered Lace Ornaments
Embroidery On Inkjet Printed Fabric
Cold Shoulder Sweater
Bracelet (In-the-Hoop)
Lace Mobile
Log Cabin Pillow
Lace Cowgirl Hat
Capped Sleeve Sweater
Embroidered Ribbon
Lace Wreath
Fur-Trimmed Cowl
Bath Towel Cape
Notebook Doodle Pillow
Hot Water Bottle Cover
Quilted Block
Bifold Wallet (In-the-Hoop)
Lace Witch Hat
Lace Tricorn Hat
Cookies (In-the-Hoop)
Photo Frame (In-the-Hoop)
Gnome (In-the-Hoop)
Applique Embroidery Basics
Lace Fascinator
Embroidery on Sweatshirts
Crafty Tool Belt
Mushroom Pincushion
Pocket Pairs
Organza Shadowbox
Raw Edge Vinyl Applique
Embroidery on Burlap
Lacy Table Runner
Embroidered Sweater Cuffs
Open Center Patch (In-the-Hoop)
Lace Coffin
Lace Mistletoe
Pop-Up Applique
Personalized Family Tree
Upcycled Lacy Cardigan
Metallic Dipped Lace
Reverse Applique
Lace Pirate Ship
Lace Treasure Box
Lace Fan
Simple Embroidered Plushies
Blanket Stitch Applique
Using Alignment Stitches
Lace Headband
Multi-Piece Cutwork Skull
Freestanding Organza
Embroidery on Towels
Steampunk Lace Mask
Cutting Edge Applique
Show More
×